The dashboard of WordPress has a Settings section that plays a central role that helps you define, personalize and control the different sections of your website. There are basically 6 WordPress Settings including General, Reading, Writing, Discussion, Media, Permalink & Privacy, and we will talk about each of these settings.
In this tutorial, we are going to discuss about all the functionality of WordPress Settings option.
What is WordPress Settings Option and How to Configure Settings
- General WordPress Settings
- Writing WordPress Settings
- Reading WordPress Settings
- Discussion WordPress Settings
- Media WordPress Settings
- Permalinks WordPress Settings
- Privacy WordPress Settings
General WordPress Settings
General Settings helps to set the fundamental configuration for your site. To access the general settings – Click on Settings -> General.
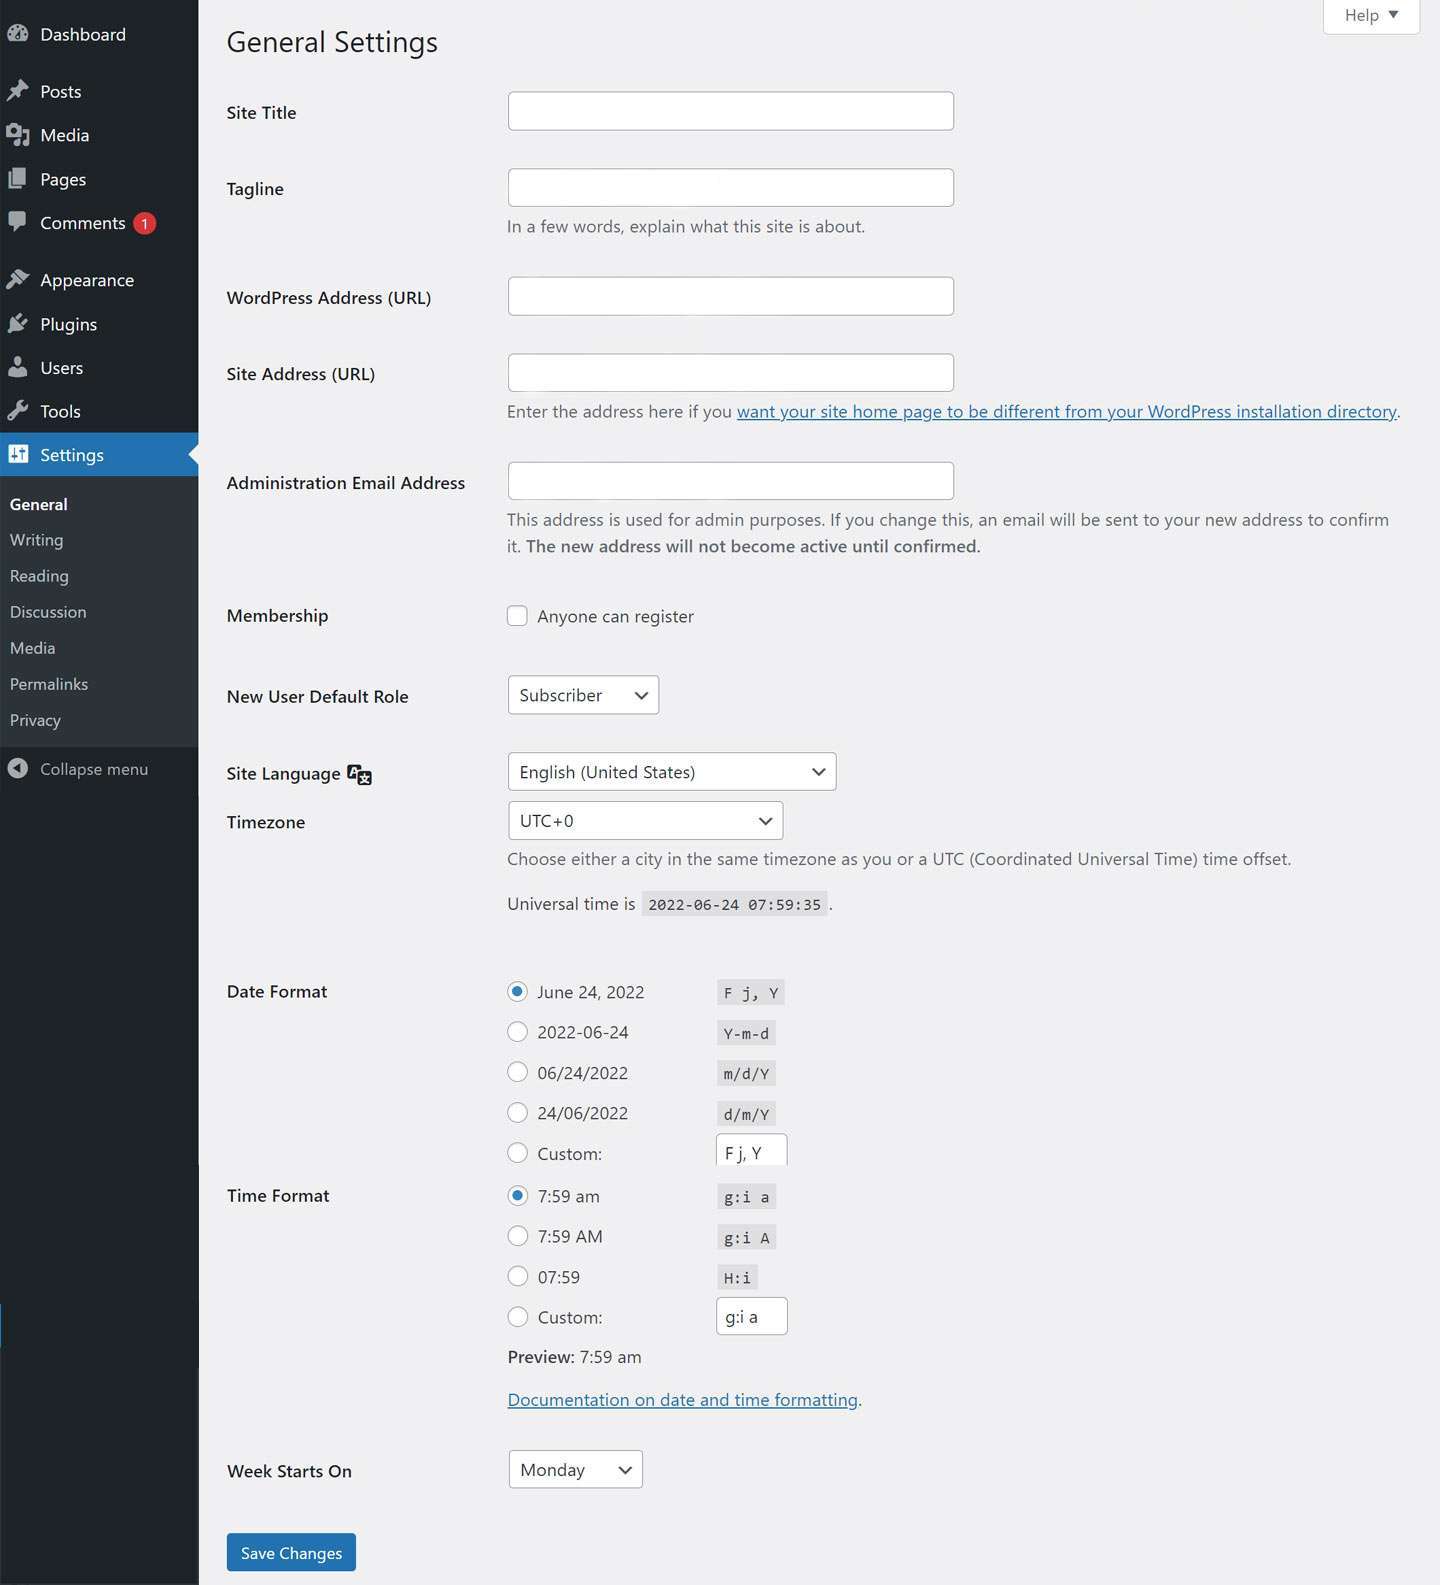
You will view the General Setting page with details of fields as shown below.
Site Title – Exhibits the site’s name in the template header.
Tagline – Explains about your site precisely.
WordPress Address (URL) – Shows the URL of the WordPress directory wherein all your vital application files are stored.
Site Address (URL) − Enter the URL of your site that you like to be displayed on the browser.
Administration E-mail Address – Make sure to enter your e-mail address that facilitates to recover your password if forgot or while updating.
Membership – Ticking the checkbox allows anybody to register his/her account on your WordPress site.
New User Default Role − The default role has been set for the new members or registered members.
Site Language – Helps set the language for your WordPress dashboard.
[affcoups id=”5001″]
Time Zone – Helps set the time zone with relevance to any particular city.
Date Format – Setting the date format as per your desire displayed on the site.
Time Format – Setting the time format as per your desire displayed on the site.
Week Starts On – Choose the weekday as per your preference to start your WordPress Calendar (by default, it’s set on Monday)
Once you fill up all information pertaining to general settings, click on -> Save Changes which helps save all information.
Writing WordPress Settings
Writing Settings help to boost the writing experience with options to customize your WordPress site. It controls the quality and attributes while adding and editing Pages, Posts of providing options like Remote Publishing, Post thru e-mail, and Update Services.
To access the writing settings – hover to Settings -> Writing option.
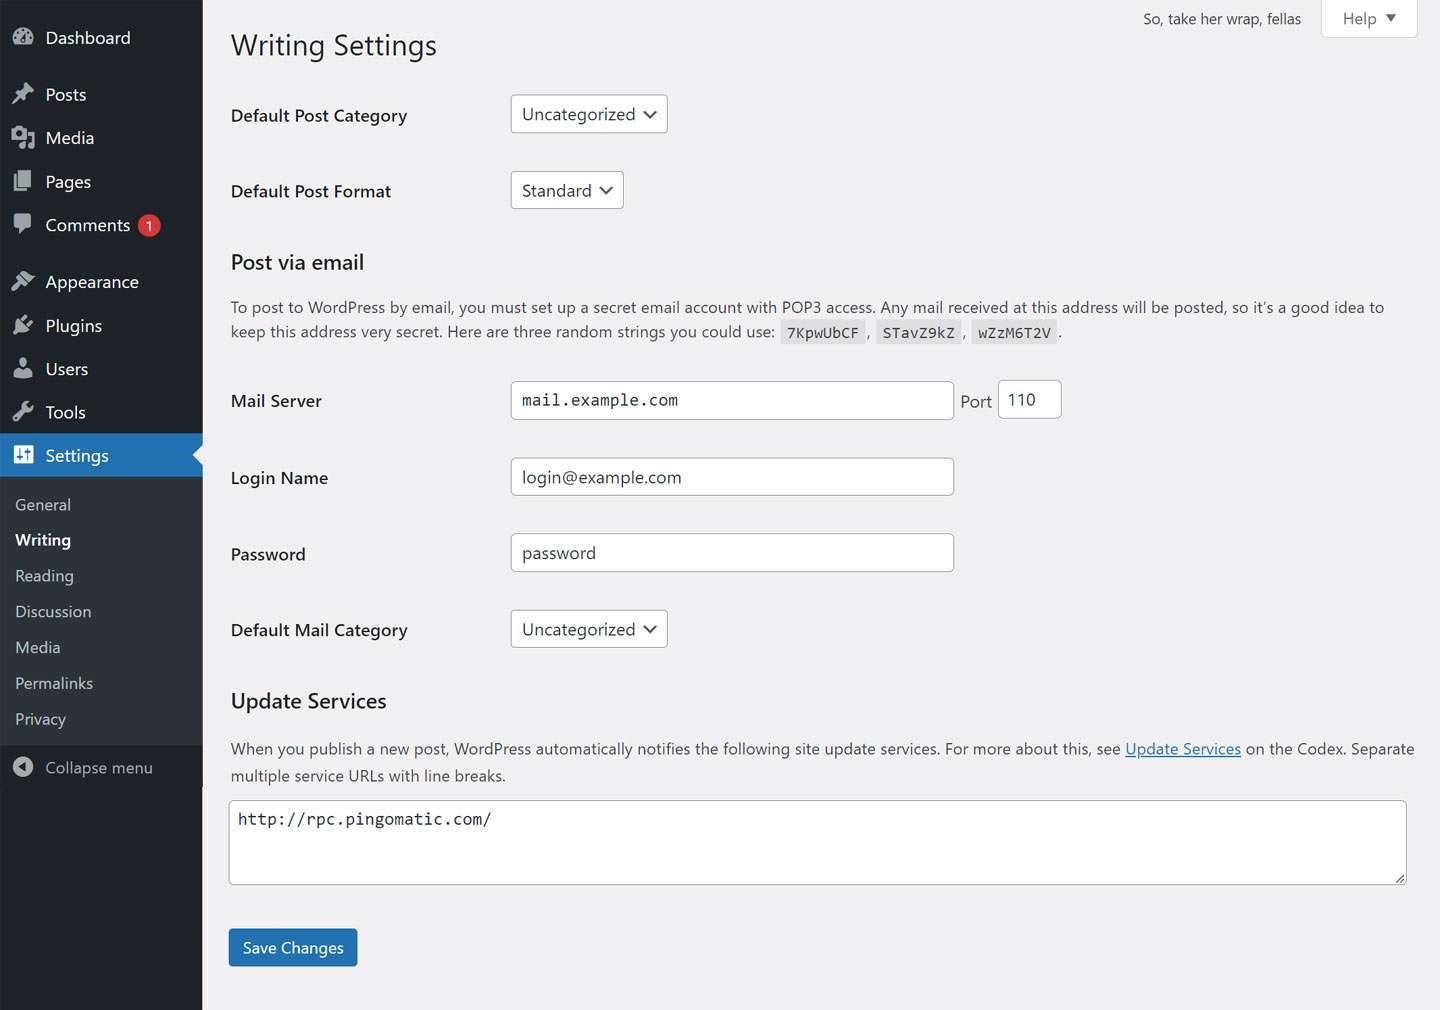
As page displays with following fields-
Default Post Category – You can categorize a post or leave it as Uncategorized.
Default Post Format − Select format of post based on themes and also enables to differentiate styles based on post types.
Post via E-mail – It uses an e-mail address to create and publish posts on your blog through e-mail. To use it, make sure to create a secret e-mail account with POP3 access. Any mail that comes to this address will get posted.
Mail Server − It permits reading the e-mails sent by you to WordPress and stores them for recovery. For this, you should have POP3 compatible mail server.
Login Name – WordPress will require its own e-mail account to create posts. The Login Name will be using this e-mail address and must be kept secret to deter spammers to post links that redirect readers to their websites.
Password − Set password for the aforesaid e-mail address.
Default Mail Category – Enables choosing a custom category for posts that are published via the Post by e-mail feature.
Update Services – Once a new post is published, WordPress notify the site update services in the box automatically.
On filling up the above information, Click -> Save Changes to save your information.
Reading WordPress Settings
Reading Settings enables you to set the content and number of posts to be displayed on the front/main page.
To access the reading settings – move to Settings -> Reading.
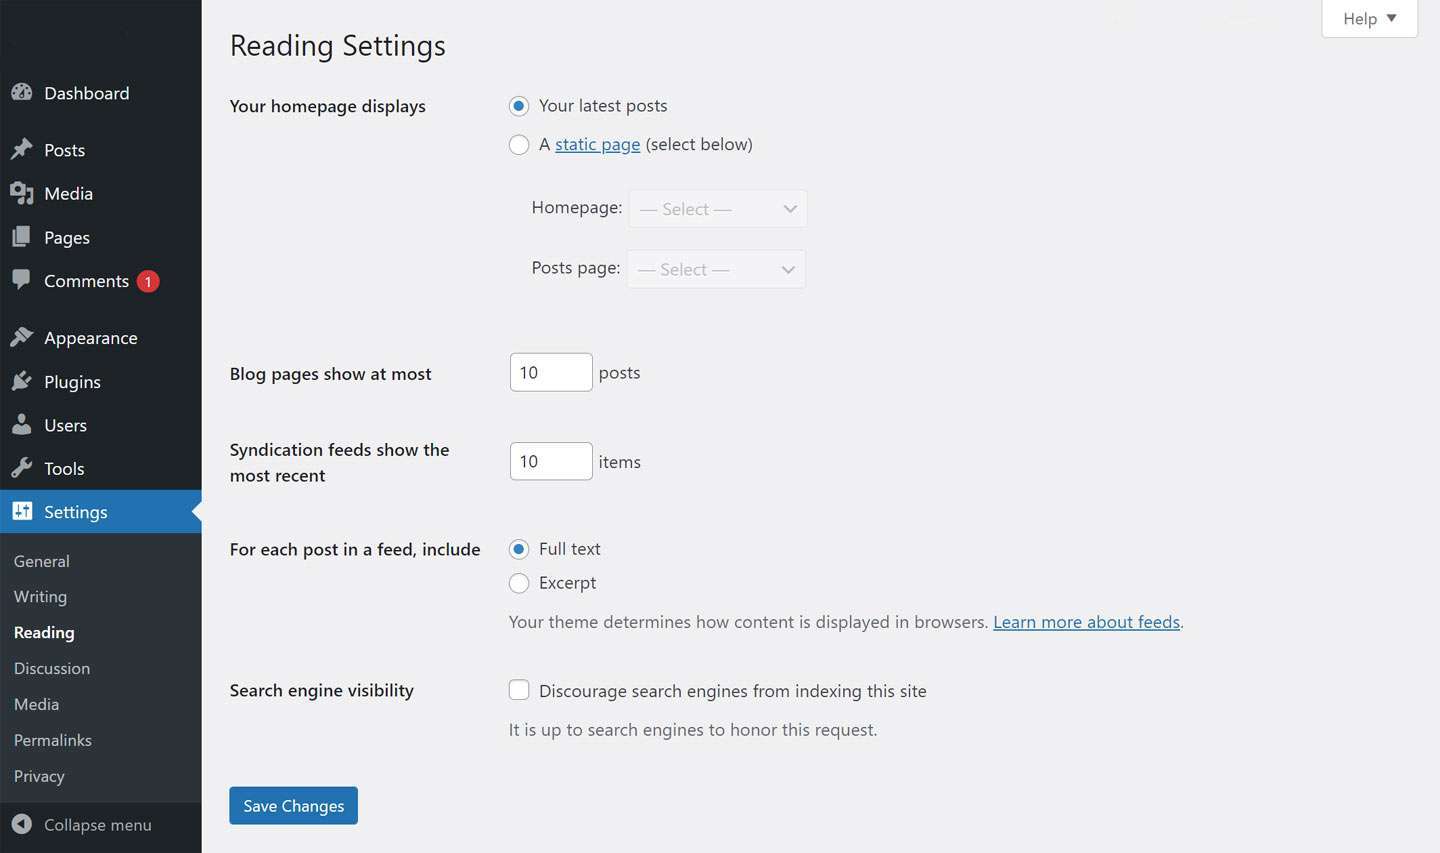
You will view the setting page as-
Your homepage displays − This section gives you the option to display either the latest page or a static page on the front page.
- Homepage – Select the page you like to display from the drop-down.
- Posts page – Also, select the page containing posts from the drop-down.
Blog pages show at most − Choose the number of posts to be displayed per page/site (By default, it’s set as 10.
Syndication feeds show the most recent – Allows the user to view the number of posts when they download one of the site feeds. It’s set as 10, by default.
For each article in a feed, include – Allows displaying the post by choosing either Full Text (set by default) or Summary of the Post (Excerpt).
Search engine visibility – Ticking the checkbox, (Discourage search engines from indexing this site) but that may be ignored.
[affcoups id=”4850″]
Once the information is fed, Click on -> Save Changes to save your information.
Discussion WordPress Settings:
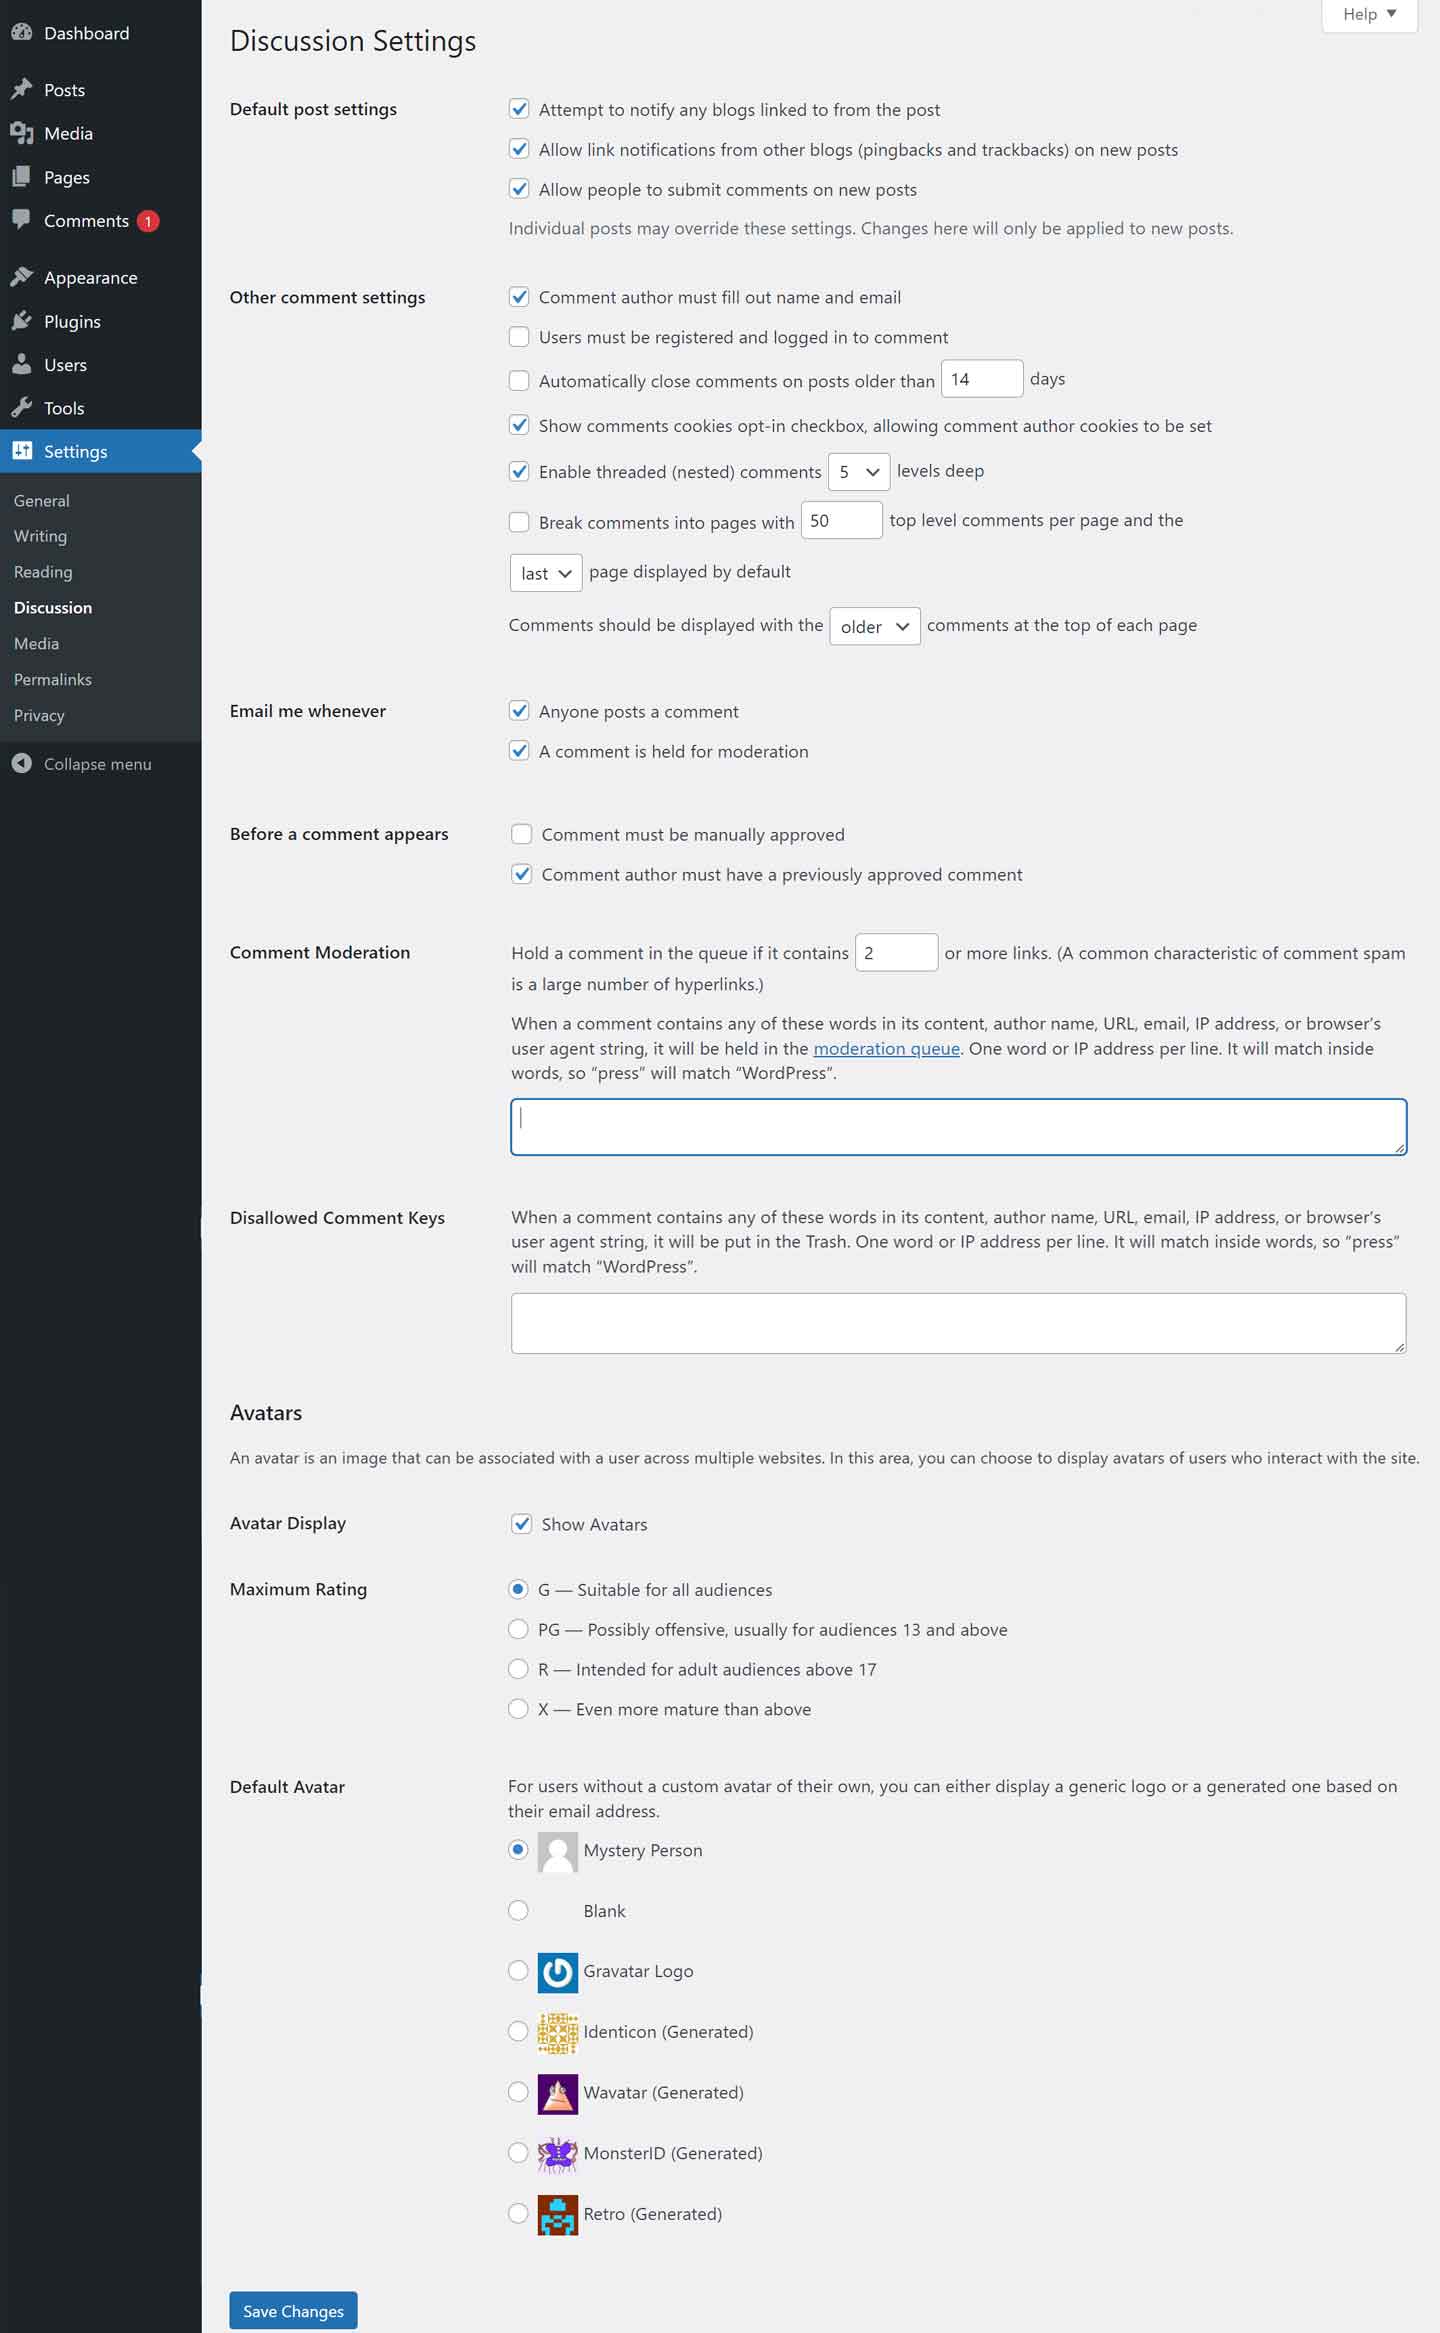
Discussion Setting allows interaction among the blogger and the visitors as well as among readers. The settings options help the admin to have control over the Posts/Pages that come in via Users.
To access the Discussion setting – Click on Settings -> Discussion.
Now you will view the page as stated below-
Default post settings – They are set as default to the newly created pages and posts. It contains 3 optional settings as below-
- Attempt to notify any blogs linked to the article – On publication of articles by you, it sends a notification to other blogs.
- Allow link notifications from other blogs (pingbacks and trackbacks) − Accepts pingbacks from other blogs.
- Allow people to post comments on new articles – The setting helps you allow or disallow viewers to Comment on your posts, you can also change this setting as per your wish for specific articles.
Other comment settings – The setting has options −
- Comment author must fill out name and e-mail – As you tick the box, it makes compulsory for visitors who want to comment to fill in their name and email address.
- Users must be registered and logged in to comment – If you tick the box, only visitors who are registered can make comments, else it allows everyone to leave comments.
- Automatically close comments on articles older than days – The option enables you to receive comments for a specific time period as you want.
- Enable threaded (nested) comments – By checking the option you can allow visitors to reply or discuss and receive responses.
- Break comments into pages with top-level comments per page and the page displayed by default – Whereas your pages receive loads of comments, you can partition them into different pages by ticking the box.
- Comments should be displayed with the comments at the top of each page – Enables to arrange the comments in ascending or descending order.
Email me whenever – The setting has 2 options-
- Anyone posts a comment – if you tick into this box, the author receives an e-mail for each comment that has been posted.
- A comment is held for moderation – tick the box if you are unwilling your comments to be updated provided it’s moderated by the admin.
Before a comment appears – The setting allows how your posts are managed and it holds 2 more settings as below –
- Comments must be manually approved − If you tick the box, then, only comments that are approved by the admin will be displayed below the posts or pages.
- Comment author must have a previously approved comment – Check the box, if you want to approve comments of only those authors who have commented earlier and his/her e-mail address matches the previously posted comment. Else, it will be held for moderation.
Comment Moderation − Contain only a specific number of links that are allowed into a comment.
Disallowed Comment Keys – By putting your spam words you can you’re your visitors to participate in comments, email or URL, e-mail, etc. Later this will filter the comments.
Avatars − Avatar defines a small image that gets displayed at the right-hand top corner of the dashboard screen alongside your name similar to your profile picture. This offers you numerous options enabling you to set the avatar for your WordPress site.
Avatar Display – Your avatar displays alongside your name if it is ticked.
Maximum Rating – WordPress offers you four other avatar options including G, PG, R, and X for your use. This relates to the age section and enables you to select the type of audience you wish to display your posts.
Default Avatar – This option allows you more types of avatars with images. You can keep them according to the e-mail address of your visitors.
Once the all information filled, Click on -> Save Changes to save your information.
Media WordPress Settings

Media Settings enables you to set the dimension (H X W) of the images that you like to use on the website.
To access − Click on Settings -> Media.
The setting page fields display as stated below:
- Thumbnail Size – Helps set the thumbnail size.
- Medium Size – Helps set the dimension (H+W) of average size images.
- Large Size − Helps Set the dimension (H +W) of larger images.
Uploading files – Choosing the option helps arrange the uploaded image into the year and month-based folders.
Once completed Click on -> Save Changes button that saves all media setting information.
Permalink WordPress Settings
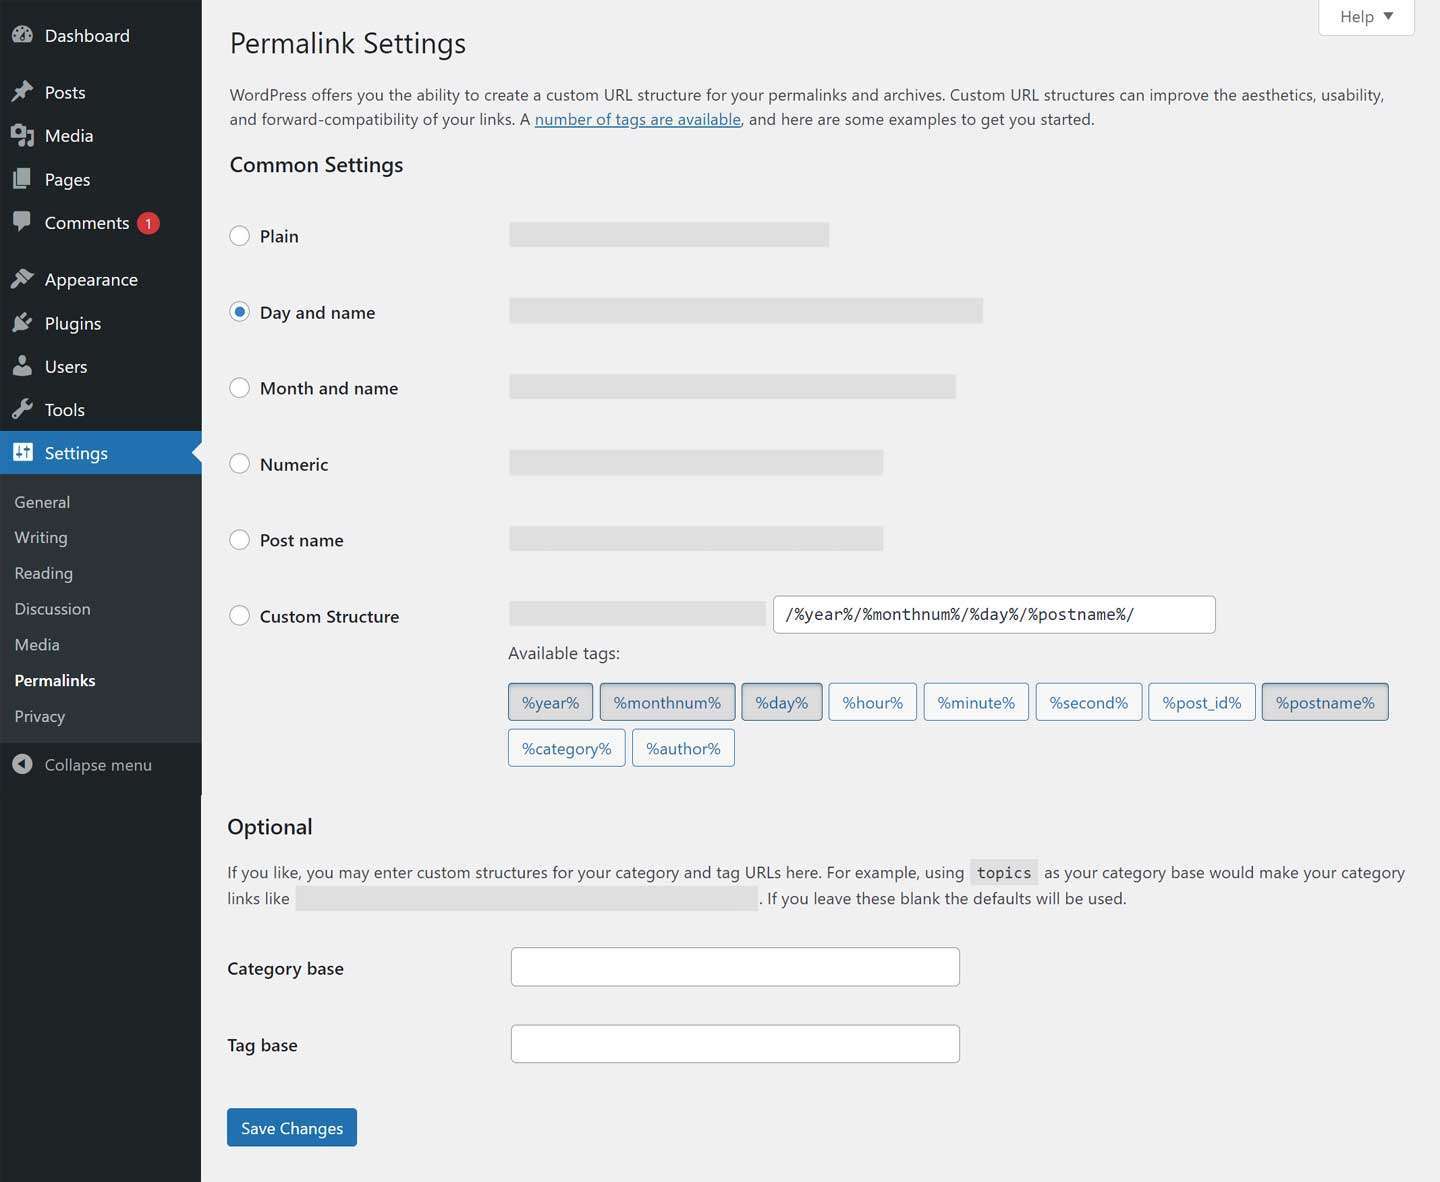
Permalink Settings refers to any permanent link to a specific blog post/category. It permits setting the default permalink arrangement and is used to add permalinks to your WordPress posts.
To access permalink settings move to Settings -> Permalinks.
The fields of the setting appear as follows-
Common Settings −
Tick the boxes to decide the structure of your permalink.
- Plain – Helps set the default URL arrangement in WordPress.
- Day and name – Sets URL’s structure based on the date and name in your posts.
- Month and name − Sets the URL structure based on the month and name in your post.
- Numeric – Sets numbers in the URL’s structure in your post.
- Post name – Helps set post name in the URL’s structure in your post.
- Custom Structure – Sets the URL structure as per your desired name in the given text box.
Optional – You can add a tailored structure for the main category/ or/ tag URL. If your text box is kept empty then default settings work. There are two options.
- Category base − Adds customized prefix for your URL category.
- Tag base − Adds a customized prefix to your Tags URL.
Once done, Click on -> Save Changes to save the permalink settings.
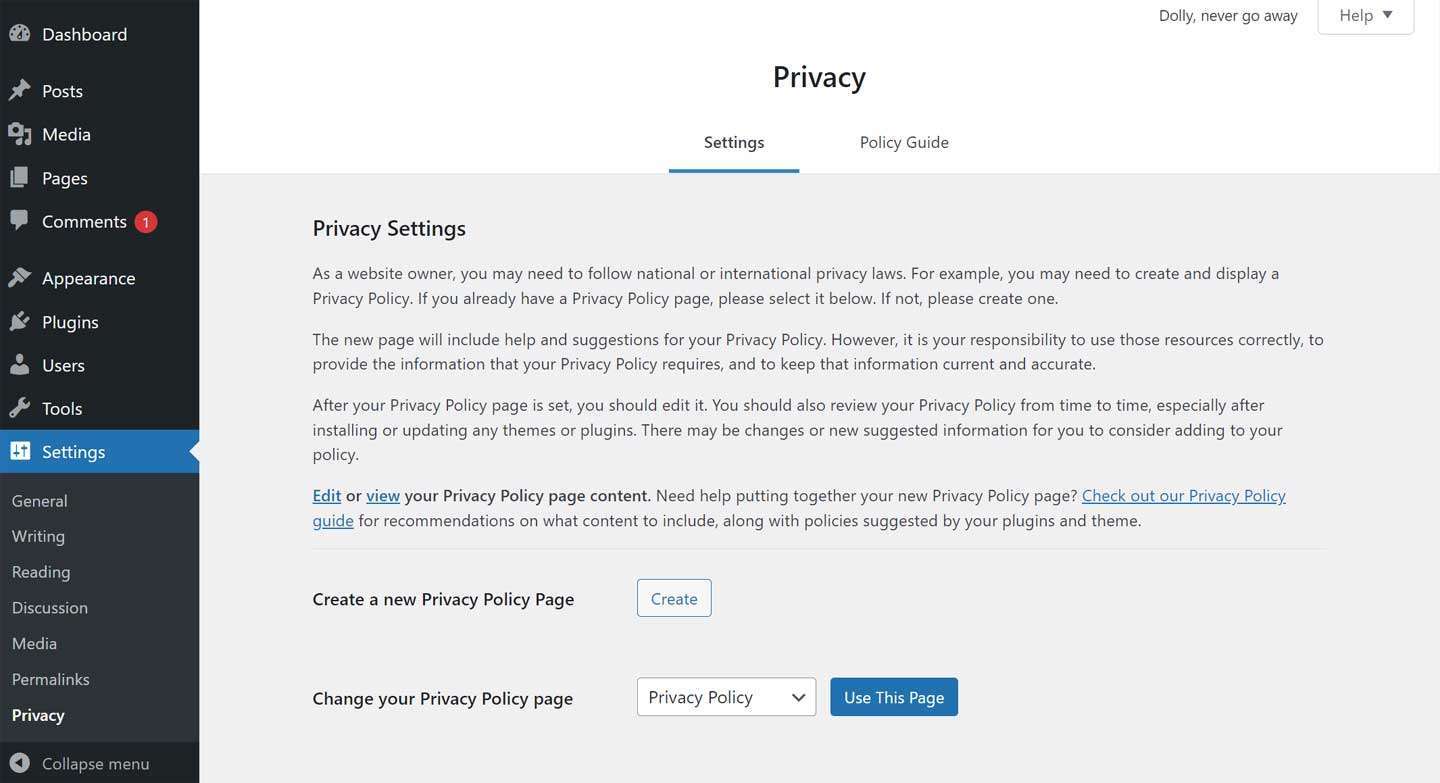
Privacy WordPress Settings
[affcoups id=”8546″]
Adopting Privacy Settings in WordPress will provide page privacy for your WordPress site.
To activate and use the Privacy Settings, you need to log in to WordPress as an Administrator
Move to Settings and then click on -> Privacy
You will find a paragraph to inform you about selecting or creating a privacy page for your site. Although, by default, a privacy page has been created for every WordPress site, however, if you are having other data then, it’s important to ensure that the privacy page is up-to-date.
Click on -> View to get a review of the page and if what to edit, click on -> Edit.
And if you want to Create a new Privacy Policy Page then you can click on -> Create for new Page and after that, you Select a Privacy Policy Page from the select box whatever you want, then click on -> Use This Page. Now your WordPress Settings option page is complete.
Conclusion
So, this is all about the WordPress Settings tool. Hopefully, the tutorial session will be helpful for working on your WordPress site effectively.